


 Woodworking Tips (8-Feb-2010)
A collection of tips for both the novice and the expert. The newest tips are at the top of the list.
- Have a look as well at my favourite wood working web sites.
- When you are serious about fine woodworking then I highly recommend The Complete Illustrated Guide series from Taunton Press. I bought these six reference books:
- Shaping Wood, by Lonnie Bird
- Joinery, by Gary Rogowski
- Furniture & Cabinet Construction, by Andy Rae
- Finishing, by Jeff Jewitt
- Jigs & Fixtures, by Sandor Nagyszalancy
- Sharpening, by Thomas Lie-Nielsen
- And for woodturning I can highly recommend Fundamentals of Woodturning, by Mike Darlow.
- When books are too dry for you then at least watch several TV or video episodes of a good craftsman. Personally I have learned a lot from The New Yankee Workshop with Norm Abram. Check the local PBS or Home and Garden TV listings.
- Measure twice, cut once.
- Wood is a natural product; if you cannot stand its inherent imperfections then woodworking may not be for you.
- A good finish is like a cherry on the pudding. Never cover wood with paint; enhance it instead with a stain and clear varnish.
- I never sand coarser than 120 grid, and seldom sand finer than 220 grid. For the 220 or finer grid I always use the black waterproof paper sheets, also for dry sanding. For larger surfaces I use a cork sanding block. Before using a new sheet of sanding paper run the back of the paper diagonally over a sharp edge. This will break the glue and release any "loose" grid.
- Various "consumables" that I normally use:
- Sure Grip carpenters glue from LePage -- 500 ml bottle.
- Wood Patch from Woodwise -- filler for red oak, and other wood types; Winsor Plywood sells it.
- TopCote from Bostik -- table and tool surface sealant to reduce sliding friction.
- DriCote from Bostik -- blade and bit cutting lubricant.
- Industrial strength cleaner and resin remover from Lee Valley -- clean blades give clean cuts.
- Stain for red oak -- Cloverdale Semi Transparent, clear base #16204, "Kitchencraft Spice" colour.
- Varnish -- Cloverdale Acrylic Urethane Varnish, satin finish #42314.
- There are two ways to "hide" joints:
- You can emphasize the joint by chamfering both edges before gluing them together, or by making sure that the two surfaces are not in the same plane, like when you join a board to a table leg.
- No matter how accurate you work there will always be a slight "gap" when you glue up for example stiles and rails of a raised panel. Glue everything and do the usual sanding. After the sanding is finished make the joint dust free. With a putty knife fill a little gap sparingly with wood filler (see previous list). Before the filler dries take a used piece of 220 grid sandpaper, gently sand over the filled area. The sanding dust will mix with the wood filler helping the colour matching. You may have to change your sand paper around several times, as it will clog up pretty quick. Keep sanding until the filler is only in the gap itself. Don't used a light filler to fill a dark knot; use a darker filler instead.
Machining Rough Sawn Wood
Here are the basic steps to get from rough sawn wood to your final size project parts using wood working machines.
Preparation
- Get your wood at least 4 weeks before you start your project in your workshop to let it adjust to the environment. Stack them on a flat surface with 3 of 4 little strips of wood in between so that air can circulate between them.
- Make a list of the rough sawn wood, noting knots, cracks, discolouration, bark, and warp (cup, bow, crook and twist). Write down the approximate useable length and width.
- Make a cutting plan of the pieces you need for your project. Round the lengths up to the next whole inch and add at least a 1/4" to the width for sawing and jointing. Shorter pieces can be combined one after the other. Narrower pieces can be put next to each other for optimal use of the board width. Try to cut long 8ft boards into manageable sizes like somewhere between 40 and 60 inches. Depending on you planer give yourself about 3" on each end of a board, or 6" extra per board, because when you run material through the planer it often have some indentation in the first few inches; also called snipe.
- Use the straightest board for the longer pieces. Use the flattest widest boards for the wider pieces. Begin with the longest pieces, then the widest pieces, and thus work your way through the material list. Mark each board on the short end with a letter and put that letter next to the item(s) on the material list that you expect to cut out of a board.
- Shorter boards have also an advantage that you have less problems and waste with warped boards. An 8ft board with a 3/8" bow that you have cut in say 46" and 50" now each have less than an 1/8" bow. Now cut up the boards with your miter saw.
Make one surface straight and flat
- With the jointer make one surface flat. Personally I prefer to take off not more than 1/32" per pass as I usually work with 6" to 8" wide red oak. Depending on the type of warp proceed as follows:
- Cup -- the board is warped between the long edges. The best way to flatten the board is with the hollow side down to take wood off from the outer edges.
- Bow -- the board is warped between the short ends. Again the best way to flatten the board is with the hollow side down to take wood off from the ends. Don't press down to hard on the centre of the board or it will take you a long time to flatten a flexible board.
- Crook -- the board is warped on the outside of a long edge. Just a few passes to straighten one surface; we take care of the crook later.
- Twist -- when you put the board on a flat surface only the two diagonal tips will touch the surface. Position the board such that you take off wood from the tips only until all four corners rest on a flat surface and then flatten as stated above.
Make other surface parallel and to thickness
- Next step is to bring the boards to the correct thickness with the planer. First sort the boards in order of thickness and start with the thickest board. Run the board through the planer with the flat side on the bottom and planer adjusted such that the planer take off just a bit from the high spots. Put the board aside and then give the next board a pass until you find a board that is too thin for this setting. Adjust the planer setting by about 1/32" and then start the sequence again with the thickest board. Continue until the second surface is machined and flat and straight. If you are not yet at the correct thickness you can turn the board over and take some wood off from the other side the next time; it counteracts the chance of secondary warp. Use a caliper to measure the tickness at several place on a board. For the last 3 to 4 passes don't take off more than 1/64".
- When you are getting close to the tickness and you don't have a caliper, but you have a calculator, then proceed as follows. Let us say that you have machined 6 board and you need to go to 3/4" thickness. Stack the 6 boards, measure the total height as accurate as you can, divide that by 6 (boards), subtract 3/4" (thickness), and multiple by 64. This give you the number of 64th you have still to take off each board.
- Both the jointer and the planer have rotating blades that cut against the feed direction. For the cleanest cut you have to cut "with" the grain. That means that when the knives are cutting the top of the board (e.g. planer) the grain should run from low in the front to high in the back. And when the knives are cutting the bottom of the board (e.g. jointer) the grain should run from high in the front to low in the back. You can also feel it with your fingertips, with the grain feels smooth and against the grain feels rough; watch out for splinters though. I use an inverted ""V" mark on the short end.
Make edges straight and perpendicular, rip boards
- Now we go back to the jointer. Select the straightest edge of a board and then run that "with" the grain over the jointer to get the edge straight and perpendicular to one of the surfaces. Repeat for the other boards.
- Now adjust the jointer setting to 1/32".
- Take a board and check your list for the width of the piece that needs to be cut from it. Set the tablesaw fence to that width plus 1/16" and rip the piece off. Make two passes with the sawn edge of the piece over the jointer. Your piece should now have the exact width and thickness. Make one passes with the sawn edge of the remaining part of the board over the jointer and then rip the next piece from it. Mark the finished pieces on the short end so you know what it is, e.g. LFL - left front leg, TD - top drawer, etc..
- Finally trim one end of each piece with the miter saw. Mark the exact other end with a sharp pencil or marking knife and then trim that end off. And there is your perfectly machined piece of wood.
Board is too wide
When a board is too wide for the jointer (my jointer is only 6") then make one pass, rotate the board and make a pass with the other side of the same surface. The surface gets straight, but never flat. Use it as the "flat" side when planing, but remember that you have to make one or two passes with this surface through the planer too after the second surface is finished.
Now with the board being too wide for the planer (my planer is 12" wide) you have a couple of options. If you have the skill of the old master carpenters you can use a good hand plane and gradually take away the high points. I am not that skilled and prefer the next solution. Say you need a 14" wide board. Machine two 7" wide boards as explained above making sure that the board have good matching grain. Then glue the two boards together using biscuits about 8" apart to make sure that the board edges line up, and use good square clamps. Clean up the glue immediately. The next day when the glue is dry use a scraper to make the joint perfect.
And finally
You have machined a perfect board, but when you rip it to make two pieces out of it the pieces warp again. Not much you can do about that. In case you required large pieces of wood you can saw each piece roughly 1/4" thicker and 1/2" wider to get most of the tension out before doing the above machining. Another trick that I use often is that I rip very long pieces (6 to 8ft) to width plus 1/8", medium long pieces (3 to 5 ft) to width plus 1/16" and anything shorter to width plus 1/32". This gives you some leeway to correct secondary warp with longer pieces.
Make your work plan and work as quickly as possible. Don't let finished pieces sit on your workbench for weeks as your are bound to get secondary warp. After the machining finished the pieces with tenons, mortises, dado slots, etc., and then put things together with glue, screws and clamps before secondary warp gets a chance.
Finally, keep the leftover pieces of wood. They have a specific thickness which might come in handy in your current project as cleats or something.
How to use a Dado
A dado consist of two outside saw blades and zero, one or more chippers. The chipper(s) go between the two outside blades. The minimum width is obtained with the two outside blades only, and can be changed in 1/8" increaments by combining the various chipper blades. The dado is assembled on the arbor of the table saw and mounted like a regular saw blade. There are other types of dados on the market.
Cutting a groove using a dado is the same as using the regular saw blade on the table saw and does not need very much explanation.
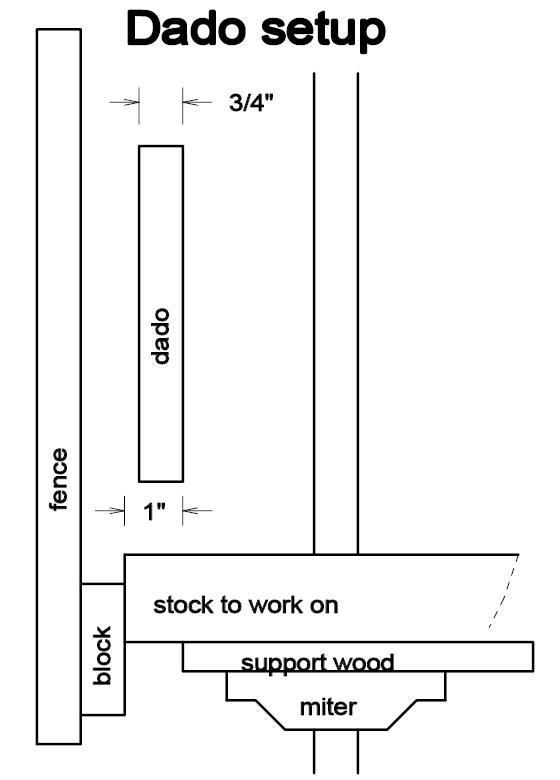
A more interesting use of the dado is the cutting of tenons on a piece of wood, i.e. make one end thinner than the rest of the piece of wood. For that we use the table saw, miter gauge and dado. Put the dado set together for a certain width and mount it in the table saw. Clamp a block of wood (about 3/4" thick) to the table saw fence on the side of the dado several inches before the dado. Attach a piece of wood to the miter gauge so that stock is properly supported when run past the dado. Set the dado height for the amount of material that needs to be take away.
For example, to cut a tenon length of 1" you have to adjust the fence such that the block of wood is offset by 1" to the left of the dado as shown in the picture. The procedure is to put the stock against the miter gauge and the block of wood on the fence. Then squeeze the stock against the miter gauge and run it past the dado. Pull the stock to the right to clear the dado and pull back. Position the stock against the miter gauge again such that the remaining material can now be removed by the dado, squeeze against the miter gauge and run past the dado again. It is highly recommended to run a couple of scrap pieces first after each dado height and tenon length adjustment and verify that the results are what is expected.
Finishing (31-May-2005)
There are many ways to finish wood. Our choice is a medium colour transparent stain for our red oak furniture, finished with a few coats of Acrylic Urethane varnish. Red oak has an open grain. You can fill the grain for a complete smooth surface, but we prefer to see and feel the grain. Some folks recommend a sanding sealer before staining and varnishing, but we have never felt the need for that.
Preparation
- Make sure all surfaces are sanded smooth with 220 grid sandpaper.
- Ensure that all surfaces and the workshop environment are dust free; we vacuum clean several times.
- Have good ventilation. We have a large extraction fan.
- Wipe the to be finished surfaces very lightly with a tack cloth just before staining.
- Have good lighting. Striking light is very helpful when applying the second and subsequent coats of varnish.
Staining
- All visible red oak surfaces are stained. Ensure that the stain stays wet for at least 15 minutes for good penetration. After that any excess stain can be wiped off.
- Let the stain dry for at least 1 day before varnishing.
- Wipe the stained surfaces with a clean cloth before varnishing.
Varnishing
- To varnish "fill" the brush, apply it in one stroke in the direction of the grain, distribute the varnish by brushing cross-grain, and finally finish by brushing with the grain.
- Leave a "wet" edge where you work so that it is easier to brush out edges with the next area you work on.
- Do not brush too much; let the properties of the varnish do the work.
- Do not try to "fix" something on a half dry surface; you make it only worse. Wait until the next coat.
- Apply thin coats. It is better to apply two thin coats than one thick coat.
- All surfaces need two coats of varnish. We recommend that desk tops and table tops get four coats of varnish.
- Let each coat dry for at least 1 day, and sand very, very lightly with 320 grid sandpaper before applying the next coat. Usually two passes with sandpaper is enough to get rid of small dust particles. Use you hand to feel for imperfections. Clean very lightly with a tack cloth.
- Drawers made from aspen and birch plywood need only one coat of varnish. After which a very light sanding with 320 grid. It is almost like applying a sanding sealer.
- The bottom of desk and table tops made from solid red oak should be stained and receive two coats of varnish. This helps to prevent warping and cupping.
- Let the final coat dry for a week before using the furniture.
- Optionally, after a month you can apply one application of natural BriWax to the desk or table top. The top will look fantastic, but the disadvantage is that you can never varnish the top again.
- If possible use a fresh can of varnish for the final coat. It is amazing how many "foreign" particles end up in a used can of varnish, while a varnish gradually thickens as well and thus loses its optimal properties.
- If you have a large job then brake it down into 1 to 2 hour jobs, and thoroughly clean the brush at each break.
- Do not strike the brush against the top rim of the can to get rid of excess varnish. The rim is one of the main sources of foreign particles such as dust and dried varnish.
Glossary of Terms (4-Dec-2006)
- bdft (board foot) -- The size of a 1 inch thick board of 1 foot by 1 foot (144 cubic inches). Board footage is typically based on the nominal dimensions of lumber, i.e. the lumber dimension in its rough sawn, green, unseasoned condition. Some places charge an extra 8% to cover shrinkage, such as caused by kiln drying of the wood. So when you buy for example 100 bdft they charge you for 108 bdft.
- DAMIFINO -- I don't know, as in: damn if I know. A typical situation when 90° is not square.
- S4S -- Sanded four sides. Often used with solid woods.
- G2S -- Good two sides. Often used with plywood that has the same high quality finish on both sides.
- SNAFU -- Situation normal, all f...d up. The usual situation after verifying measurements twice and then still cutting the wrong size.

