Needlepoint Stand -- 7 hours -- Can$ 63.00 -- Beginner
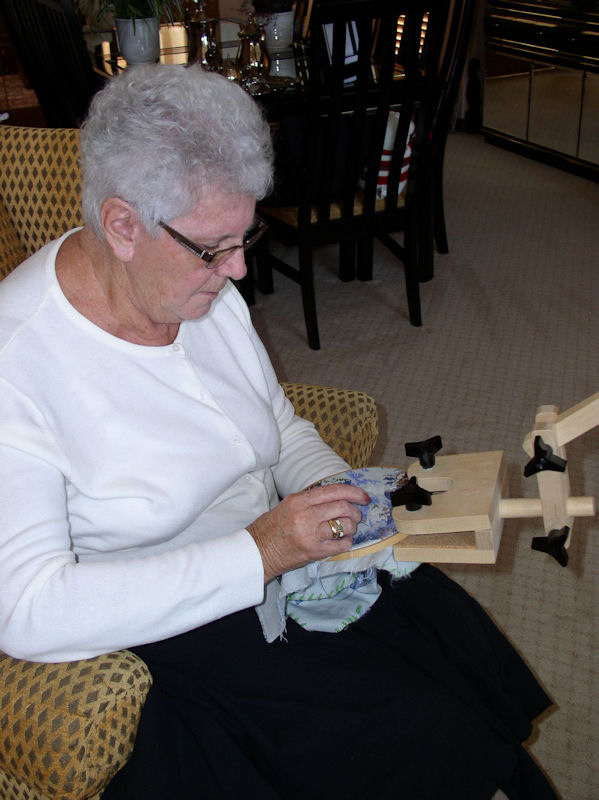
Jeannette does a lot of cross stitching. She stretches the material in a hoop and holds the hoop in her left hand while doing the cross stitching with her right hand. I shopped around and checked the internet for a needlepoint stand to make her life a bit easier, that is being able to clamp the hoop in the stand so that she can use both hands for doing the cross stitching. The nicest one I found was the floor stand offered by Jeanette Ardern Designs. But at US$ 100.00 plus shipping and handling, I figure that I could do a better job, and sure enough one 8 feet maple board and some hardware did the trick.
Pictures
Click on a picture to get a larger picture and then used the back button of the browser to return.
Full viewDetail of headStand in useStand in use
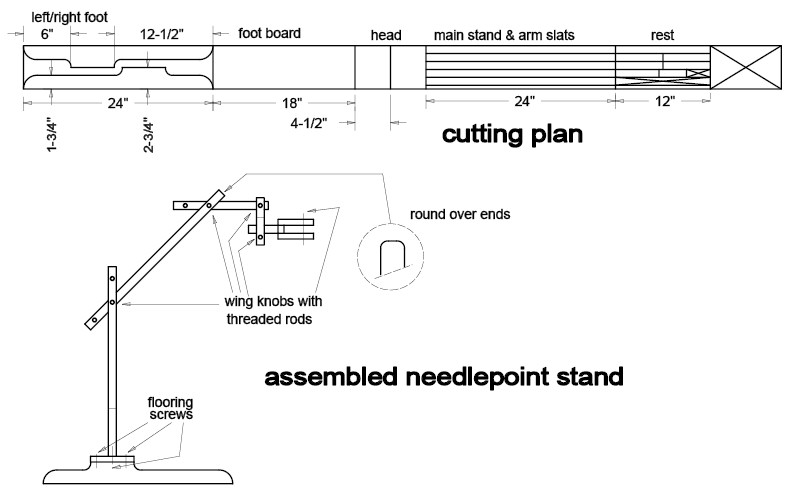
Plans, Drawings, Sketches (inches) (13-Feb-2006)
To view or print the full scale drawing just click on a drawing, and then use the print-preview of the browser to select portrait/landscape format and (re)size the drawing before doing the actual printing.
Materials List (inches)
no.
description
length
width
thickness
suggested basic material, comments
1
left/right foot
24
2 3/4
3/4
8 feet 1" x 6" maple S4S (3/4" x 5 1/2" finished)
1
foot board
18
5 1/2
3/4
see above
3
main stand slat
24
1
3/4
see above
2
main stand filler
6
1
3/4
see above
2
main arm slat
24
1
3/4
see above
1
second arm slat
12
1
3/4
see above
2
head holder
6
1
3/4
see above
1
head holder filler
3 1/2
1
3/4
see above
2
top/bottom head
4 1/2
5 1/2
3/4
see above
1
head filler
5 1/2
1
3/4
see above
1
dowel
5
7/8
2
dowel
1 1/4
1/4
1 or 2
cork
5 1/5
3 3/4
1/8
typically sold in 12" x 24" sheet
1
threaded rod
24
1/4-20
(Lee Valley Tools)
6
2" 3-wing knob (female)
1/4-20
(Lee Valley Tools)
7
4-prong T-nut
1/4-20
(Lee Valley Tools) typically sold per 10
6
washer
1/4
4
flooring screw
2
#8
2
flooring screw
3
#8
LePage carpenter's glue
yellow, cabinet maker's quality
5 seconds superglue
use with care!!!
Buy good quality maple that is not warped.
Required Tools
Power tools -- table saw, miter saw, band or scroll saw, router, drill press, hand drill, random orbit sander.
Hand tools -- screw driver, sanding block, tape measure, square, clamps, roundover router bit, #8 drill bit with countersink, 7mm or 9/32" drill, 7/8" forstner bit, metal saw, metal file.
Construction
All measurements are in inches (1 inches = 2.54 cm) because all wood measurements in the shop are in inches. I recommend to cut, shape and sand all pieces and dryfit them together with clamps.
Cut and shape the stock
Sand the 8 feet board on both sides if necessary. Cut the stock according to the materials list and the cutting plan. Before continueing please note that the slats are 1" by 3/4". Keep in mind that the slats are "sandwiched" together with the 1" sides, and that holes are drilled in the center of the 1" sides.
Sand the sides of the slats. Drill a 7 mm (or 9/32") holes in the main stand slats, the main arm slats and the second arm slat at 1 1/2" and 4 1/2" from one end. Drill also a hole in the main arm slats and the second arm slat at 1 1/2" from the other end. Drill a hole at 1" from both ends of the head holders and at one end from the head holder filler. Round over the ends of all slats where a hole is drilled; i.e. one end of the main stand slats and one end of the head holder filler piece is not rounded over!
Sandwich and glue the main stand slats together separated by the main stand filler pieces. Clamp and let dry. Sand flush and then trim the bottom nice and square with the side. Ease over all edges with sandpaper. Sandwich and glue the head holder slats together separated by the head holder filler piece. Clamp and let dry. Sand flush. Drill a hole the size of the 7/8" dowel at 2" from the end where the filler piece is. Finally separate the head holder by cutting right through the center of the filler piece. Ease over all edges with sandpaper.
Next hammer the 4-prong T-nuts in the two holes on one side of the main stand, and on one side of the main arm at the end where there is only one hole. Finally also in the holes on the outside of one head holder. Make sure to support the pieces properly or they might split.
Shape the left and right foot with a band or scroll saw, and round over the top, but not where the foot board has to come. Round over the top of the foot board.
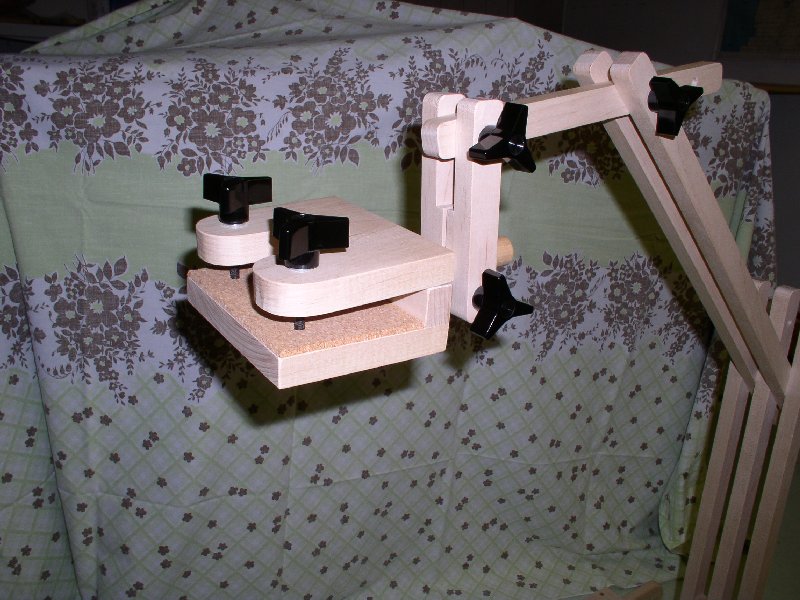
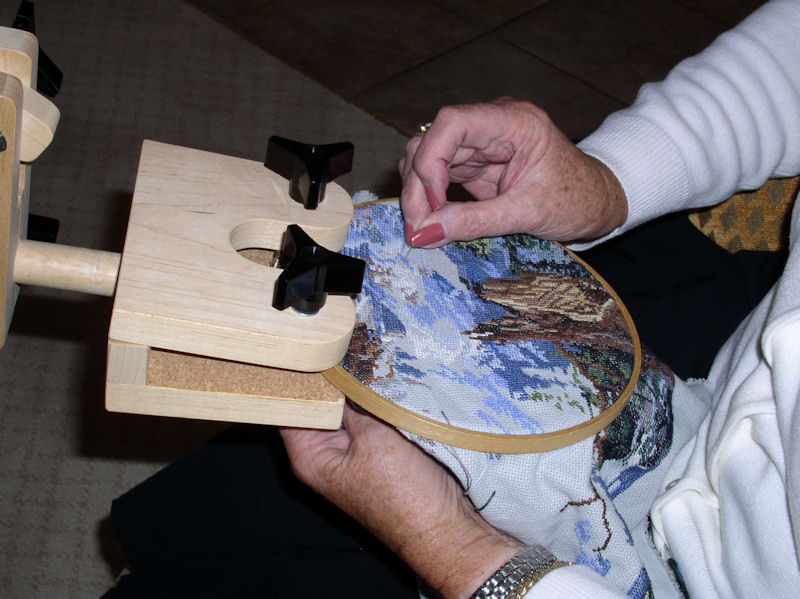
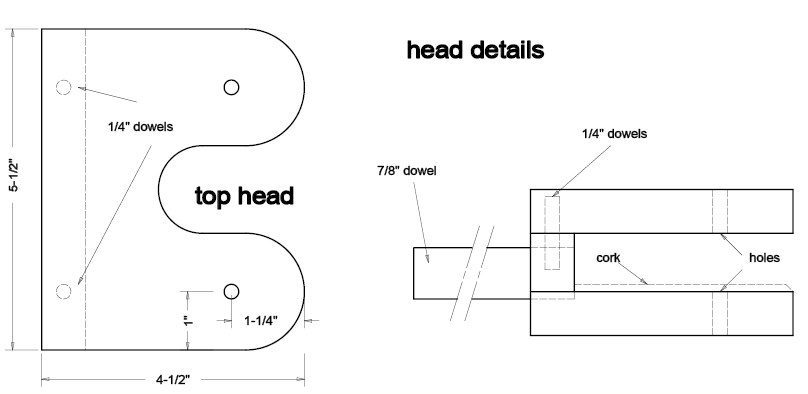
Shape the top piece of the head according to the drawing. Put the top and bottom pieces together and drill the two 7mm (9/32") holes. Glue the 3/4" side of the head filler onto the bottom piece and let dry. Drill a hole the size of the 7/8" dowel at 1" from the bottom through the bottom and filler pieces at exactly the depth of the filler piece (3/4"). Glue the dowel in place. Drill two holes in the filler piece for the 1/4" dowel and glue them in place. Drill two holes in the top piece of the head matching the position of the two dowels. Drill the holes a bit wider than the dowels are so that the top piece can move freely. Hammer the 4-prong T-nuts in the two holes at the underside of the bottom piece. Cut a piece of cork and glue to the bottom piece.
Final assembly
First determine if the person using the needlepoint stand is left or right handed. For a right handed person the knops should be on the righthand side and the 4-prong T-nuts on the left, and vice versa. Now comes the tricky part. Position the main stand at the exact center of the foot board. I put a scrap piece of wood between the main stand slats and clamped it to the foot board with two clamps. Once I was satisfied that the main stand was centered and perpendicular to the foot board I drilled two pilot holes with countersink and fasten everything with the 3" flooring screws. Next I positioned the footboard on top of the left and right feet; letting it stick out a wee bit on the outside. Secure each site with one 2" screw. Then make sure that the feet are square to the foot board and put in the second 2" screw.
Next prepare the knob with threaded rod for the main stand. Cut a piece of threaded rod the width of the main stand plus the amount that goes into the knob. File the ends nice and smooth where it was sawn off. Screw the rod quickly into the knob using a drop of superglue. Slide the main arm slats between the slats of the main stand and tighten together with the rod/knob you just made. Do the same with the main arm and the second arm joint, and the second arm and head holder joint. Place the dowel of the head between the head holder amd tigthen the rod/screw.
Finally put the hoop with cross stitch work between the top and bottom head pieces and tighten the two rod/knobs. In case of a thinner hoop you can add more layers of cork. Enjoy.
Special considerations
Looking at the drawing of the assembled needlepoint stand you notice that the main stand and the main arm have an extra piece sticking out. The way the stand is assembled in the drawing is suitable for normal used from a regular, easy or reclining chair. If this is the only way the needlepoint stand will be used then both the main stand and main arm slats can be cut 3" shorter and they don't need the holes at 4 1/2" either. As this was my prototype I left the extra material on, figuring that the stand can be used also from a more ackward position like a hospital bed. In which case an extra swivel is needed to rotate the head 90 degrees.