Contents

![]()
![]()

A collection of tips based on my own experience in the area we live, North-West of Calgary, at an elevation of 4,250 feet or 1,295 meters. You always have to gauge these tips against what we try to accomplish on our acreage.
My wife wanted a new, heart-shape flowerbed in the middle of our back lawn. All that is really needed is a sharp square spade and a wheelbarrow. We wanted about 2 feet of good garden soil, but as it turned out there was a layer of hard clay at about 1 foot deep that needed to be taken out as well. Here is how that was done.
From the above flowerbed we have sods and clay that we need to get rid off. It just so happens that we have an elongated, tear shaped pond with the point towards the front of our yard. We like to gradually shorten the pond by getting rid of that point. We do that by filling up the point and let the ground gently slope towards the pond.
Starting from an existing level we need to mark with pegs where and how we like the ground to slope. For that we need the next set-up.
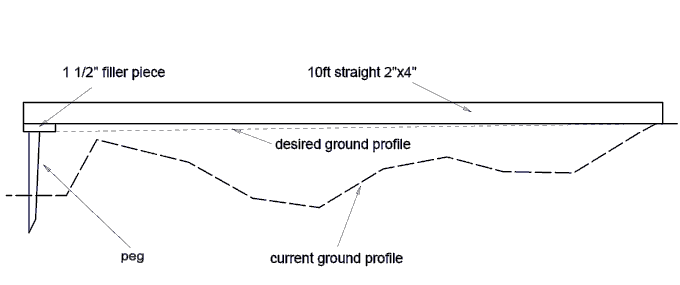
We take a straight piece of 10 feet 2" by 4" lumber. We nail a 1½" thick scrap piece of wood on one end and let it rest on a peg we drove in the ground and let the other end of the lumber rest on existing land. When the top of the lumber is level then the dotted line represents the desired slope of the ground, i.e. 1½" per 10 feet. You may have to use several pegs for a larger area.
Now use the the sods and clay to fill up to about 2" to 3" below the desired ground level. Make sure that everything is properly tamped down and that you have at least 1" of clay on top.
To lay the sods start working from the existing leveled ground. Place a sod in the desired spot and eyeball which part(s) of the sod is too high. Turn the sod up-side down and remove excess dirt from the underside of the sod. Place the sod again and tamp down the sod. After each sod check that the top of the sod follows the desired ground level.
Finish off your project by filling any openings between sods with top soil and adding a bit of grass seed if needed. Finally water thoroughly.
There are many words written about pruning and trimming of shrubs and trees, and when is the best time to clean away the old foliage of perennials. We find that the best way is to watch nature and take your cue from that.
In autumn or early winter perennials shed their leaves which fall at the base of a plant. Often the old stems stay upright or fall over with or without the leaves attached. Leave all that as it is. Ideal for extra protection of the root system against the cold, but especially against drying out of the soil. Old growth is great for catching snow and thus provide extra protection. When is the best time to clean up? Spring, but wait until you see the first new leaves, and then you can clean away the old growth.
Trimming or pruning trees is best done in spring too, unless it is a species that requires special pruning. For example, the double flowering plum needs pruning after it has bloomed as it blooms on old wood, i.e. branches that have grown the previous year.
We start the process by cutting away any dead wood, often called winter kill. We typically don't do very much else until the tree or shrub is established, say in the second or third year. For an established tree or shrub we take a step back, look at it, and imagine what we want it to look like. We might shorten a branch that sticks out to much, or remove an entire branch that rubs against another branch in order to give the remaining branches more space to grow. Some trees or shrubs may need more rigorous pruning, for example by pruning a third off of each branch so that new side branches will grow on it, and thus create a fuller tree or shrub. Sometimes the opposite action is needed when a tree gets too dense. Then whole branches may have to be cut away to thin the top, and thus to promote a healthy growth.
Raspberry shrubs that bear fruit on old wood (canes grown the previous year), need special treatment, and this is how we do it. In fall leave all the canes on the plant. Wait in spring until the old canes have green leaves and you see the first signs of flowers. Then you trim/prune away the dead ends or complete dead canes. As you pick and enjoy the fresh raspberries you will notice that new canes are growing from the base of shrub. Once there are no raspberries left to pick, usually September, then you can cut away all the canes from last year and thus leaving only this year's growth on the plant.
Roses you let bud out in spring. After that you can see which branches to trim because of winter kill. Next is the shaping of the rose bush. To grow a healthy and full rose bush you typically will prune a branch such that it has two or three healthy eyes or new growth. Preferably with the top eye facing outward.
Most perennials, roses and annuals, you grow most likely for their flowers. To encourage new flowers it is often recommended to dead head, i.e. remove the spent flowers so that the plant does not waste energy in forming seed heads.
Remember, gardening is not an exact science; it is an art, and with some imagination and a bit of tender love and care your garden will be a pleasure to work in and a delight to look at.
![]()
![]()
Homepage |
Grand Tour |
Main Yard Details |
Flowerbed Details |
Yard Tips |
Wildlife |
Animal Terminology |
Other Web Sites